Saturday, September 26, 2020

Message Queue - message types reception

Consider this the extension of the previous post on Message Queue.  We will see how we can retrieve messages of different types.

Write2.c

 1
 2
 3
 4
 5
 6
 7
 8
 9
10
11
12
13
14
15
16
17
18
19
20
21
22
23
24
25
26
27
28
29
30
31
32
33
34
35
36
37
38
39
40
41
#include <stdio.h>
#include <sys/ipc.h>
#include <sys/msg.h>
#include <string.h>

struct msgbuf {
	long mtype;
	char mtext[20];
} mymsg;

int main()
{
	key_t key;
	int msgid;
	
	key=ftok("dummy.txt",65);
	msgid = msgget(key,0666 | IPC_CREAT);
	printf("Key - %x ;MessageId - %d \n",key,msgid);

	mymsg.mtype = 1;	
	strcpy(mymsg.mtext,"its my world 1 \0");
	msgsnd(msgid,&mymsg,strlen(mymsg.mtext),0);	
	printf("Sent Type: %d Data: %s\n",mymsg.mtype,mymsg.mtext);

	mymsg.mtype = 2;	
	strcpy(mymsg.mtext,"its my world 2 \0");
	msgsnd(msgid,&mymsg,strlen(mymsg.mtext),0);	
	printf("Sent Type: %d Data: %s\n",mymsg.mtype,mymsg.mtext);
	
	mymsg.mtype = 3;	
	strcpy(mymsg.mtext,"its my world 3 \0");
	msgsnd(msgid,&mymsg,strlen(mymsg.mtext),0);	
	printf("Sent Type: %d Data: %s\n",mymsg.mtype,mymsg.mtext);
	
	mymsg.mtype = 4;	
	strcpy(mymsg.mtext,"its my world 4 \0");
	msgsnd(msgid,&mymsg,strlen(mymsg.mtext),0);	
	printf("Sent Type: %d Data: %s\n",mymsg.mtype,mymsg.mtext);
	
	return 0;
}

We have created message queue, and passing 4 messages of different types 1,2,3 and 4.

Read2.c

 1
 2
 3
 4
 5
 6
 7
 8
 9
10
11
12
13
14
15
16
17
18
19
20
21
22
23
24
25
26
27
28
29
30
31
32
33
34
#include<stdio.h>
#include <sys/ipc.h>
#include <sys/msg.h>
#include <errno.h>

struct msgbuf {
	long mtype;
	char mtext[20];
} mymsg;

int main(int argc, char *argv[])
{
	key_t key;
	int msgid;
	int type;
	type = atoi(argv[1]);

	key=ftok("dummy.txt",65);
	msgid=msgget(key,0644);
	printf("Key - %x ;MessageId - %d \n",key,msgid);
	
	while (1)
	{			
		msgrcv(msgid,&mymsg,sizeof(mymsg),type,IPC_NOWAIT);
		if (errno == ENOMSG) {
			printf("No messages\n");
			break;
		} else {
			printf("Received Data,%s\n",mymsg.mtext);
			printf("Received Data type, %d\n\n",mymsg.mtype);
		}
	}
	return 0;
}
  • Line 16 - Passing the 'message type' as command line argument
  • Line 22 - We run the while loop to receive all the messages available with the mentioned message type.
  • Line 24 - The last argument IPC_NOWAIT is used to instruct 'msgrcv' to return immediately if there is no message present in queue.  'errno' will be set with 'ENOMSG' when this happens.

Demonstration

For different values of msgtypes, the msgrcv behave accordingly

Positive: Picks the first message in the queue corresponding to this type

 1
 2
 3
 4
 5
 6
 7
 8
 9
10
11
12
13
14
15
16
17
18
19
20
21
22
23
24
25
26
27
28
29
30
31
[root@msgq]# ./write2
Key - 41014da0 ;MessageId - 327680
Sent Type: 1 Data: its my world 1
Sent Type: 2 Data: its my world 2
Sent Type: 3 Data: its my world 3
Sent Type: 4 Data: its my world 4

[root@msgq]# ./read2 3
Key - 41014da0 ;MessageId - 327680
Received Data,its my world 3
Received Data type, 3

No messages

[root@msgq]# ./read2 3
Key - 41014da0 ;MessageId - 327680
No messages

[root@msgq]# ./read2 2
Key - 41014da0 ;MessageId - 327680
Received Data,its my world 2
Received Data type, 2

No messages

[root@msgq]# ./read2 4
Key - 41014da0 ;MessageId - 327680
Received Data,its my world 4
Received Data type, 4

No messages
  • Line 1-6 - Populating 4 types of messages in the message queue
  • Line 8 - Receive message type 3. Successful
  • Line 15 - Receive message type 3.  No message present
  • Line 19 - Receive message type 2. Successful
  • Line 26 - Receive message type 4. Successful
Lets clear the queue using 'ipcrm -a' and proceed to next type

Zero: Reads the first receive message in the whole message queue, irrespective of the type

 1
 2
 3
 4
 5
 6
 7
 8
 9
10
11
12
13
14
15
16
17
18
19
20
21
22
[root@msgq]# ./write2
Key - 41014da0 ;MessageId - 360448
Sent Type: 1 Data: its my world 1
Sent Type: 2 Data: its my world 2
Sent Type: 3 Data: its my world 3
Sent Type: 4 Data: its my world 4

[root@msgq]# ./read2 0
Key - 41014da0 ;MessageId - 360448
Received Data,its my world 1
Received Data type, 1

Received Data,its my world 2
Received Data type, 2

Received Data,its my world 3
Received Data type, 3

Received Data,its my world 4
Received Data type, 4

No messages
  • Line 1-6 - Populating messages of different type
  • Line 8 - Passing the value of type 0
  • Line 10-20 - Receiving the messages 1, 2, 3, 4 in the same order as in lines 1-6
Negative: Receives all the messages belonging to the types less than the absolute value of the number passed in fifo order

 
 1
 2
 3
 4
 5
 6
 7
 8
 9
10
11
12
13
14
15
16
17
18
19
20
21
22
23
24
25
26
27
28
29
30
31
32
33
34
35
36
37
38
[root@msgq]# ./write2
Key - 41014da0 ;MessageId - 360448
Sent Type: 1 Data: its my world 1
Sent Type: 2 Data: its my world 2
Sent Type: 3 Data: its my world 3
Sent Type: 4 Data: its my world 4

[root@msgq]# ./read2 -2
Key - 41014da0 ;MessageId - 360448
Received Data,its my world 1
Received Data type, 1

Received Data,its my world 2
Received Data type, 2

No messages

[root@msgq]# ipcrm -a

[root@msgq]# ./write2
Key - 41014da0 ;MessageId - 393216
Sent Type: 1 Data: its my world 1
Sent Type: 2 Data: its my world 2
Sent Type: 3 Data: its my world 3
Sent Type: 4 Data: its my world 4

[root@msgq]# ./read2 -3
Key - 41014da0 ;MessageId - 393216
Received Data,its my world 1
Received Data type, 1

Received Data,its my world 2
Received Data type, 2

Received Data,its my world 3
Received Data type, 3

No messages
  • Line 1-6 - Populating messages of different types
  • Line 8 - Receiving the type '-2', meaning retrieve all messages less than type 2 in FIFO order
  • Line 18 - Clearing the message queue
  • Line 20-25 - Populating messages of different types
  • Line 27 - Receiving the type '-3', meaning retrieve all messages less than type 3 in  FIFO order

Message Queue - Basic

 Today, we see the message queues.  The advantages is available everywhere on the internet.  Summary is one process can communicate with another process.  Better picture is available in this link:

https://www.tutorialspoint.com/inter_process_communication/images/multiple_message_queue.jpg

Here we have two programs 'write.c' and 'read1.c'.  Write.c will write a message into message queue of type 1.  It will be taken by read1.c.

Write.c

 1
 2
 3
 4
 5
 6
 7
 8
 9
10
11
12
13
14
15
16
17
18
19
20
21
22
23
24
25
26
27
28
#include <stdio.h>
#include <sys/ipc.h>
#include <sys/msg.h>
#include <string.h>

struct msgbuf {
	long mtype;
	char mtext[20];
}mymsg;

int main()
{
	key_t key;
	int msgid;
	
	key=ftok("dummy.txt",65);
	msgid = msgget(key,0666 | IPC_CREAT);
	printf("Key - %x ;MessageId - %d \n",key,msgid);

	mymsg.mtype = 1;	
	strcpy(mymsg.mtext,"its my world 1 \0");
	
	msgsnd(msgid,&mymsg,strlen(mymsg.mtext),0);	
	
	printf("Sent Data\n");

	return 0;
}
  • Line 6 - This is the typical template of message used in message queues.  First long will be message type.  Rest of it is message.  It can be further defined as any data type.
  • Line 16 - We need a unique key for creating a msgq.  We use 'ftok' command that takes in two arguments. File that the process can read and any character.  Retriever process should also use the same arguments and create the key.
  • Line 17 - 'msgget' creates a message queue(because we use IPC_CREAT mask) with key from 'ftok' and some permissions.  It gives message queue identifier, just like file identifier to communicate
  • Line 20-21 - Populate the message with message type '1' and the text.
  • Line 23 - 'msgsnd' to send the message to queue to let others take it.  Arguments will be message identifier, Address of message, size of message(excluding the 'long' type)

Read1.c

 1
 2
 3
 4
 5
 6
 7
 8
 9
10
11
12
13
14
15
16
17
18
19
20
21
22
23
24
25
#include<stdio.h>
#include <sys/ipc.h>
#include <sys/msg.h>

struct msgbuf {
	long mtype;
	char mtext[20];
} mymsg;

int main()
{
	key_t key;
	int msgid;
	
	key=ftok("dummy.txt",65);
	msgid=msgget(key,0644);
	printf("Key - %x ;MessageId - %d \n",key,msgid);
	
	msgrcv(msgid,&mymsg,sizeof(mymsg),1,0);
	printf("Received Data,%s\n",mymsg.mtext);
	printf("Received Data type, %d\n",mymsg.mtype);
	
	msgctl(msgid,IPC_RMID,NULL);
	return 0;
}
  • Line 5-8 - Same as in write.c
  • Line 15 - To 'ftok' we pass the same arguments as in write.c.
  • Line 16 - 'msgget' to get message identifier.  We do not use IPC_CREAT as message queue already created by write.c
  • Line 19 - 'msgrcv' to read the message into mymsg.  4th argument is message type that we wish to read.
  • Line 23 - 'msgctl' to delete the memory of message queue.

Demonstrate

Lets take the programs for a ride

 1
 2
 3
 4
 5
 6
 7
 8
 9
10
11
12
13
14
15
16
17
18
19
[root@msgq]# gcc write.c -o write
[root@msgq]# ./write
Key - 41014da0 ;MessageId - 327680
Sent Data
[root@msgq]# ipcs

------ Message Queues --------
key        msqid      owner      perms      used-bytes   messages
0x41014da0 327680     root       666        15           1

------ Shared Memory Segments --------
key        shmid      owner      perms      bytes      nattch     status
0x00000000 131072     root       600        393216     2          dest
0x00000000 262146     root       600        524288     2          dest

------ Semaphore Arrays --------
key        semid      owner      perms      nsems

[root@svtap01end1 msgq]#

We have sent the message to message queue. 'ipcs' is the linux command that shows the details of message queue. 'ipcrm -a' is one of the commands that will delete all the details of the shared memory listed here.  We haven't used it though.  In another terminal or the same terminal lets run read1.c.

1
2
3
4
5
[root@msgq]# gcc read1.c -o read1
[root@msgq]# ./read1
Key - 41014da0 ;MessageId - 294912
Received Data,its my world 1
Received Data type, 1

You see that the message 'its my world 1' is received by read1.c

Tuesday, September 8, 2020

Native VLAN - Demo

 Usually, for a multi-VLAN network the PCs are connected to 'access' ports of the switch.  Instead of 'access' port, we use the combination of 'trunk' port and 'native-vlan'.

Trunk port - Port in switch where VLAN-tagged packets will pass through.
Native VLAN - Packets passing through the port that belongs to Native VLAN Id will have no-VLAN tagging.

Steps usually will be

  1. Create VLANs in the switch that will be used.(vlan x)
  2. Assign vlan id as Native VLAN to the port(switchport trunk native vlan x)
  3. Allow the same vlan id in the port(switchport trunk allowed vlan x)
  4. If there is a switch on the other side of the link, it should also have same native vlan id.  Else port will be blocked by STP.
We use the following topology:


VL20-1 and VL20-2 are separated by series of switches.  VL20-1, connected to Trunk port having native vlan 20.  VL20-2 is connected to access port of vlan 20.

VL30-1 and VL30-2, belonging to VLAN 30, separted by couple of switches.  VL30-1, connected to Trunk port having native vlan 30.  VL30-2 is connected to access port of vlan 30.

Lets go through the configurations of switches one by one. Starting with 

Switch4

 1
 2
 3
 4
 5
 6
 7
 8
 9
10
11
12
13
14
15
16
17
18
19
Switch#conf t
Enter configuration commands, one per line.  End with CNTL/Z.
Switch(config)#vlan 20
Switch(config-vlan)#ex
Switch(config)#vlan 30
Switch(config-vlan)#ex
Switch(config)#int fa0/2
Switch(config-if)#switchport mode access 
Switch(config-if)#switchport access vlan 20
Switch(config-if)#no shut
Switch(config-if)#ex
Switch(config)#int fa0/1
Switch(config-if)#switchport mode access
Switch(config-if)#switchport access vlan 30
Switch(config-if)#ex
Switch(config)#int fa0/3
Switch(config-if)#switchport trunk encapsulation dot1q
Switch(config-if)#switchport mode trunk
Switch(config-if)#switchport trunk allowed vlan 20,30
  • Creating VLAN (Lines 3 to 6)
  • Making Ports fa0/2 and fa0/1 as access ports to vlan 20 and 30 respectively(Lines 8 to 15)
  • Making Port fa0/3 as Trunk port allowing vlans 20 and 30(Lines 16 to 19)

Switch6

 1
 2
 3
 4
 5
 6
 7
 8
 9
10
11
12
13
14
15
16
17
18
19
Switch(config)#vlan 20
Switch(config-vlan)#ex
Switch(config)#vlan 30
Switch(config-vlan)#ex
Switch(config)#int fa0/2
Switch(config-if)#switchport trunk encapsulation dot1q
Switch(config-if)#switchport mode trunk
Switch(config-if)#switchport trunk allowed vlan 20
Switch(config-if)#ex
Switch(config)#int fa0/1
Switch(config-if)#switchport trunk encapsulation dot1q
Switch(config-if)#switchport mode trunk
Switch(config-if)#switchport trunk allowed vlan 20,30
Switch(config-if)#ex
Switch(config)#int fa0/3
Switch(config-if)#switchport trunk encapsulation dot1q
Switch(config-if)#switchport mode trunk
Switch(config-if)#switchport trunk native vlan 30
Switch(config-if)#switchport trunk allowed vlan 30
  • Create VLANs 20 and 30, as both are used in this switch(Lines 1 to 4)
  • Make fa0/2 as Trunk to pass vlan 20 from Switch5(lines 5 to 9)
  • Make fa0/1 as Trunk to pass vlans 20 and 30 to and from Switch4 (Lines 10 to 14)
  • Make fa0/3 as Trunk, to allow vlan30 as Native vlan(equal to access port) (Lines 15 to 19)

Switch5

 1
 2
 3
 4
 5
 6
 7
 8
 9
10
11
12
13
14
Switch#conf t
Switch(config)#vlan 20
Switch(config-vlan)#ex
Switch(config)#int fa0/3
Switch(config-if)#switchport trunk encapsulation dot1q
Switch(config-if)#switchport mode trunk
Switch(config-if)#switchport trunk allowed vlan 20
Switch(config-if)#ex
Switch(config)#int fa0/1
Switch(config-if)#switchport trunk encapsulation dot1q
Switch(config-if)#switchport mode trunk
Switch(config-if)#switchport trunk allowed vlan 20
Switch(config-if)#switchport trunk native vlan 20
Switch(config-if)#ex
  • Create VLAN 20, as it is the only VLAN used (Lines 2 to 3)
  • Make fa0/3 as Trunk to allow vlan 20 to other switches(Lines 4 to 8)
  • Make fa0/1 as Trunk to allow vlan 20 as Native vlan id(equal to access port) (Lines 9 to 14)

Testing

  • Configured VL20-1 and VL20-2 with IP address as 20.0.0.20/8 and 20.0.0.2/8 respectively.  Ping is successful.
  • Configured VL30-1 and VL30-2 with IP addresses 30.0.0.30/8 and 30.0.0.3/8 respectively.  Ping is successful

Sunday, August 16, 2020

Spanning Tree - Tree Creation

Today, we pick a network with switches and see step by step how the final tree is formed.  Steps will be 

  1. Selecting Root Bridge in the network
  2. Selecting Root Port for every switch
  3. Selecting Designated Port for every segment/link
  4. Selecting Alternate Ports 
  5. Forwarding/Blocking/Tree

Topology

Selecting Root Bridge

We select the Root Bridge that has least (priority.mac address) value.  As default priority is 32769 for all switches.  Now the switch with least mac address, i.e. Switch A having  0001.439C.7B5E is selected as Root Bridge.


Selecting Root Ports in Every Switch

One of its connected port will be elected as Root Port in a switch. The selecting process will be:
  • Lowest Root path cost
  • Lowest Sender Bridge ID
  • Lowest Sender Port Priority Value
  • Lowest port priority value within the switch
Cost of traversing a link depends on the type of physical link used:
  • Fast Ethernet 100Mbps costs 19
  • Gigabit Ethernet 1000Mbps costs 4
When calculating the cost, we calculate both at the start and the end.  Start of the link incurs zero cost. At the end of the link the cost depends on the physical link.

Root Port of Switch B

We can reach Switch B from Root Bridge through 
  • A.Fa0/1 - B.Fa0/1
  • A.Fa0/2 - C.Fa0/2 - C.Ga0/1 - B.Ga0/1
  • A.Fa0/3 - C.Fa0/3 - C.Ga0/1 - B.Ga0/1
  • A.Fa0/2 - C.Fa0/2 - C.Fa0/4 - D.Fa0/4 - D.Fa0/3 - B.Fa0/3
  • A.Fa0/3 - C.Fa0/3 - C.Fa0/4 - D.Fa0/4 - D.Fa0/3 - B.Fa0/3 
Have a look at the diagram, we will traverse the path "A.Fa0/3 - C.Fa0/3 - C.Ga0/1 - B.Ga0/1".  From A.Fa0/3, as the distance is not covered yet, path cost will be 0.  When it reaches C.Fa0/3, as it travelled through fast ethernet link, the cost is 19.  At CGa0/1, as it only changed the port within the switch, no additional cost will be incurred.  So, at Ga0/1, cost remains unchanged at 19.  When reaching B.Ga0/1, we would have crossed a Gigabit Ethernet Link that costs '4'.  So, the adding 4 to the cost, the root path cost at B.Ga0/1 will be 23.

Similary, we mark the costs at all the links and choose B.Fa0/1 as Root Port for switch B.

Root Port of Switch C

Root Port of Switch D


Selecting Designated Port for every link/segment

Every link here has 2 points.  There may be cases where a hub will be in between and segment will comprise of more than 2 points.  Selection process
  • Lowest Root path cost
  • Lowest Bridge ID
  • Lowest Port Priority Value
Here is the diagram with all the root path cost calculated for all segments/links.  For every link, we selected Designated port with least root path cost.  One exception, B.Ga0/1 - C.Ga0/1 has equal root path cost.  As Bridge ID of switch B is lesser, B.Ga0/1 gets chosen as Designated port.  Also, observe that all the ports of Root Bridge will be selected as Designated Ports.

Selecting Alternate Port

Any port that is not Root or Designated will become Alternate Port.

Forwarding/Blocking/Tree

All Alternate Ports will be blocked.  All Root Ports and Designated Ports will be in forwarding State.  
For a link to be active, both ends has to be in forwarding state.  If we trace that, final tree will be the result.


Remember, Blocking ports only mean that switch will not pass any data towards that, but BPDUs will be sent and received.  This is because if there is any change in topology then the calculation will happen again, and may be one of the blocking ports comes to forward state or vice-versa.

In Cisco Packet Tracer, we make the setup observe the interface and role columns.  It will match with the tree diagram.

 1
 2
 3
 4
 5
 6
 7
 8
 9
10
11
12
13
14
15
16
17
18
19
20
21
22
23
24
25
26
27
28
29
30
31
32
33
34
35
36
37
38
39
40
41
42
43
44
45
46
47
48
49
50
51
52
53
54
55
56
57
58
59
60
61
62
63
64
65
66
67
68
69
70
71
72
73
74
75
76
77
78
79
switch-A#show spanning-tree 
VLAN0001
  Spanning tree enabled protocol ieee
  Root ID    Priority    32769
             Address     0001.439C.7B5E
             This bridge is the root
             Hello Time  2 sec  Max Age 20 sec  Forward Delay 15 sec

  Bridge ID  Priority    32769  (priority 32768 sys-id-ext 1)
             Address     0001.439C.7B5E
             Hello Time  2 sec  Max Age 20 sec  Forward Delay 15 sec
             Aging Time  20

Interface        Role Sts Cost      Prio.Nbr Type
---------------- ---- --- --------- -------- --------------------------------
Fa0/3            Desg FWD 19        128.3    P2p
Fa0/1            Desg FWD 19        128.1    P2p
Fa0/2            Desg FWD 19        128.2    P2p

switch-B#show spanning-tree 
VLAN0001
  Spanning tree enabled protocol ieee
  Root ID    Priority    32769
             Address     0001.439C.7B5E
             Cost        19
             Port        1(FastEthernet0/1)
             Hello Time  2 sec  Max Age 20 sec  Forward Delay 15 sec

  Bridge ID  Priority    32769  (priority 32768 sys-id-ext 1)
             Address     000B.BE33.284A
             Hello Time  2 sec  Max Age 20 sec  Forward Delay 15 sec
             Aging Time  20

Interface        Role Sts Cost      Prio.Nbr Type
---------------- ---- --- --------- -------- --------------------------------
Fa0/3            Desg FWD 19        128.3    P2p
Fa0/1            Root FWD 19        128.1    P2p
Gi0/1            Desg FWD 4         128.25   P2p


switch-C#show spanning-tree 
VLAN0001
  Spanning tree enabled protocol ieee
  Root ID    Priority    32769
             Address     0001.439C.7B5E
             Cost        19
             Port        2(FastEthernet0/2)
             Hello Time  2 sec  Max Age 20 sec  Forward Delay 15 sec

  Bridge ID  Priority    32769  (priority 32768 sys-id-ext 1)
             Address     00D0.58CE.8C09
             Hello Time  2 sec  Max Age 20 sec  Forward Delay 15 sec
             Aging Time  20

Interface        Role Sts Cost      Prio.Nbr Type
---------------- ---- --- --------- -------- --------------------------------
Fa0/4            Desg FWD 19        128.4    P2p
Fa0/2            Root FWD 19        128.2    P2p
Fa0/3            Altn BLK 19        128.3    P2p
Gi0/1            Altn BLK 4         128.25   P2p

switch-D#show spanning-tree 
VLAN0001
  Spanning tree enabled protocol ieee
  Root ID    Priority    32769
             Address     0001.439C.7B5E
             Cost        38
             Port        3(FastEthernet0/3)
             Hello Time  2 sec  Max Age 20 sec  Forward Delay 15 sec

  Bridge ID  Priority    32769  (priority 32768 sys-id-ext 1)
             Address     0001.C717.DA66
             Hello Time  2 sec  Max Age 20 sec  Forward Delay 15 sec
             Aging Time  20

Interface        Role Sts Cost      Prio.Nbr Type
---------------- ---- --- --------- -------- --------------------------------
Fa0/3            Root FWD 19        128.3    P2p
Fa0/4            Altn BLK 19        128.4    P2p

Saturday, August 15, 2020

FIFO - file to file transfer

 Today, we try to send a message through FIFO file from one program to another program.

(write)file_send|>>----------------file_fifo.txt----------------------->>|file_recv(read)

Sender Script

 1
 2
 3
 4
 5
 6
 7
 8
 9
10
11
12
13
14
15
16
17
18
19
20
21
#include<stdio.h>
#include<stdlib.h>
#include<string.h>
#include<fcntl.h>

int main()
{
	char fil[15]="file_fifo.txt";
	
	char wrch[20];
	int siz=20;

	memset(wrch,'\0',siz);
	strcpy(wrch,"hello world");
	
	int fd = open(fil,O_WRONLY);
	int cw=write(fd,wrch,siz);
	printf("Sender: write -%s- of %d chars to %s\n",wrch,cw,fil);
	
	return 0;
}

Lets breakdown the script 

  1. Line 8: Take the fifo file into a string
  2. Line 10-14: Initialize the string with "hello world"
  3. Line 16: Open the file in write only mode
  4. Line 17: Send the text

Receiver Script

 1
 2
 3
 4
 5
 6
 7
 8
 9
10
11
12
13
14
15
16
17
18
19
20
#include<stdio.h>
#include<stdlib.h>
#include<fcntl.h>

int main()
{
	
	char fil[15]="file_fifo.txt";
	mkfifo(fil,0666);
	
	char rdch[20];
	int siz=20;

	int fd = open(fil,O_RDONLY);
	printf("Receiver: Waiting for message from Sender\n");
	int rd=read(fd,rdch,siz);
	printf("Receiver: read -%s- of %d chars to %s\n",rdch,rd,fil);
	
	return 0;
}

Lets breakdown the script
  1. Line 8-9: Create a fifo file using mkfifo function. As receiver is to the executed before sender, we have to create fifo file here.
  2. Line 11-12: Initialize character array to read the message from Sender program.
  3. Line 14: Open the fifo file in read only mode
  4. Line 16: Read the message from sender into rdch string

Execution

Start the receiver first.  It will be blocked waiting for message from Sender.
1
2
3
# gcc fifo-recv.c -o fifo-recv
# ./fifo-recv
Receiver: Waiting for message from Sender

Start the sender in another terminal.  It will send the message.
1
2
3
# gcc fifo-send.c -o fifo-send
# ./fifo-send
Sender: write -hello world- of 20 chars to file_fifo.txt

Verify in the receiver terminal, receive program would have received the message.
1
2
3
4
# gcc fifo-recv.c -o fifo-recv
# ./fifo-recv
Receiver: Waiting for message from Sender
Receiver: read -hello world- of 20 chars to file_fifo.txt

FIFO - Basic

Today, we replicate whatever we did on Pipes-Basic using FiFo.  It is a pipe, but a name assigned to it.  If I have a pipe, I can access only within the program, forked program and its decendants.  I have to call it using integer array.

If I have a fifo, I can access it just like any other file.  I can pass the information from one program to another.  Now, we pass information from parent to child and then from child to parent using 2 FIFO files.

(read)child|<<----------------file_p2c.txt-----------------------<<|parent(write)

(write)parent|>>----------------file_c2p.txt----------------------->>|child(read)

 1
 2
 3
 4
 5
 6
 7
 8
 9
10
11
12
13
14
15
16
17
18
19
20
21
22
23
24
25
26
27
28
29
30
31
32
33
34
35
36
37
38
39
40
41
42
43
44
45
#include<stdio.h>
#include<stdlib.h>
#include<string.h>
#include<unistd.h>
#include<fcntl.h>

int main()
{
	char p2c[15]="file_p2c.txt";
	char c2p[15]="file_c2p.txt";
	mkfifo(p2c,0666);
	mkfifo(c2p,0666);
	
	char wrch[20],rdch[20];
	int siz=20;

	memset(wrch,'\0',siz);
	strcpy(wrch,"hello world");
	
	pid_t id=fork();
	if(id != 0)
	{
		int wfd = open(p2c,O_WRONLY);
		int cw=write(wfd,wrch,siz);
		printf("write -%s- of %d chars to %s\n",wrch,cw,p2c);
		
		int rfd = open(c2p,O_RDONLY);
		int cr=read(rfd,rdch,siz);
		printf("read -%s- of %d chars from %s\n",rdch,cr,c2p);
		
		wait(id,NULL,0);
	} else {
		int rfd = open(p2c,O_RDONLY);
		int cr=read(rfd,rdch,siz);
		printf("Read -%s- of %d chars from %s\n",rdch,cr,p2c);
		
		printf("Sleeping for 5 seconds\n");
		sleep(5);
		
		int wfd = open(c2p,O_WRONLY);
		int cw=write(wfd,wrch,siz);
		printf("write -%s- of %d chars to %s\n",wrch,cw,c2p);
	}
	return 0;
}

Lets get into breaking down the code: 

Creating FiFo files (#9 to #12)
Use mkfifo procedure to create 2 fifo files with 666 permission(read and write and not execute for all)

Initializing string buffers (#14 to #18)
Create 2 read and write strings.  Initialize write string with "hello world"

Fork a child (#20)

Opening FiFO files;parent to child (#23, #33)
Parent opens the file_p2c.txt in write mode, child opens file_p2c.txt in read mode

Send traffic; parent to child(#24,#25,#34,#35)
Parent writes the wrch string and child reads into rdch string.

Sleep for 5 seconds(#38)

Opening FiFO files; child to parent(#27, #40)
Child opens the file_c2p.txt in write mode, parent opens file_c2p.txt in read mode

Send traffic; child to parent(#28,#29,#41,#42)
Child writes the wrch string and parent reads into rdch string.

Harvest Time

When this program is run

1
2
3
4
5
6
# ./a.out
write -hello world- of 20 chars to file_p2c.txt
Read -hello world- of 20 chars from file_p2c.txt
Sleeping for 5 seconds
write -hello world- of 20 chars to file_c2p.txt
read -hello world- of 20 chars from file_c2p.txt

Observe that first 2 lines, we transfer data from parent to child.  Sleep for 5 seconds and then transfer the same string from child to parent.

Wednesday, August 12, 2020

Pipes - Basic

 Today, we demonstrate pipe using a simple example.  It is a way to transfer data between different processes created by fork and its descendants.  It is a unidirectional way of communication.  It is created and handled by kernel and will be controlled by our program.

(read)fdx[0]|<<----------------FDX-----------------------<<|fdx[1](write)

(write)fdy[0]|>>----------------FDY----------------------->>|fdy[1](read)

In the program, we create two pipes FDX and FDY.  We send a string "hello world" from parent to child.  Sleep for 5 seconds.  Send the same string back from child to parent.

 1
 2
 3
 4
 5
 6
 7
 8
 9
10
11
12
13
14
15
16
17
18
19
20
21
22
23
24
25
26
27
28
29
30
31
32
33
34
35
36
37
38
39
40
41
42
#include<stdio.h>
#include<stdlib.h>
#include<string.h>
#include<unistd.h>

int main()
{
	int fdx[2];
	int fdy[2];
	char s[20];
	int siz,cw,cr;
	
	siz=sizeof(s);
	memset(s,'\0',siz);
	strcpy(s,"hello world");
	
	pipe(fdx);
	pipe(fdy);
	
	pid_t fk = fork();
	if(fk != 0) 
	{
		cw = write(fdx[1],s,siz);
		fprintf(stdout,"PIPE FDX: sent %d chars\n",cw);
		
		cr = read(fdy[0],s,siz);
		fprintf(stdout,"PIPE FDY: received -%s- of %d chars\n",s,cr);
		wait(fk,NULL,0);
		
	} else {
		cr = read(fdx[0],s,siz);
		fprintf(stdout,"PIPE FDX: received -%s- of %d chars\n",s,cr);
		
		fprintf(stdout,"Sleeping for 5 seconds\n");
		sleep (5);
		
		cw=write(fdy[1],s,siz);
		fprintf(stdout,"PIPE FDY: sent the received fdx string -%s- of %d chars\n",s,cw);
		
	}
	return (0);
}

Lets skip the library declarations.  Breaking down the code.

Preparing String(#13 to #15)

Create string of size 20.  Fill it with all NULLs.  Initialize with "hello world".

Creating Pipes(#17 and #18)

Creating two pipes fdx and fdy

Forking(#20)

Fork the process

Send Traffic from Parent to Child(#23, #24, #31, #32)

Pass string 's' to write function with (write end of the pipe)fdx[1] and read it in the child with (read end of the pipe)fdx[0].

After sleeping for 5 seconds.

Same string is passed to (write end of pipe)fdy[1] at the child and read in the parent using read function with (read end of the pipe)fdy[0].

Conclusion(#28)

Use wait function to pause the parent till child ends.

Harvesting

When executed the shell shows like this

1
2
3
4
5
6
# ./a.out
PIPE FDX: sent 20 chars
PIPE FDX: received -hello world- of 20 chars
Sleeping for 5 seconds
PIPE FDY: sent the received fdx string -hello world- of 20 chars
PIPE FDY: received -hello world- of 20 chars

Sunday, May 10, 2020

Gnuplot - Multiplot

Gnuplot has the option to combine multiple graphs in a layout.  The following picture has the terminology.

  • The whole map will be referenced as (0,0) starting with bottom-left, stretching upto (1,1) till top-right.
  • If we need to embed a graph inside this layout.  We have to specify the origin of the graph, i.e. where the top left of graph to be placed.  Also, we specify the size, i.e. how much area it is going to occupy.  All this has to be with reference to (0,0) and (1,1) size of multiplot.
  • From the picture you can see the margins: left margin(lmargin), right margin(rmargin), top margin(tmargin), bottom margin(bmargin).  These has to be mentioned starting from bottom left position of the layout.

Offset

How much ever we try to plot a layout, there will always be adjustment that has to be done for Labels, tics, titles.  In this case, we use the offset that specifies the alignment of that entity with reference from its default position.  

It definitely takes a trial and error approach to make a desired multiplot.  

Syntax

set multiplot { layout <rows>,<cols>
                {rowsfirst|columnsfirst} {downwards|upwards}
                {title <page title>}
                {scale <xscale>{,<yscale>}}
                {offset <xoff>{,<yoff>}}
              }
unset multiplot

Example

Following are the 4 data files

file1.dat

Time, read1,read2,read3
20,    4.9, 17.1, 78.1 
25,    4.0, 22.0, 74.0 
30,    2.0, 17.0, 81.0 
35,   11.5, 21.7, 66.8 
40,    4.7, 18.0, 77.4 
45,    3.8,  8.9, 87.3 
50,    0.6, 17.3, 82.1 
55,    2.0,  3.4, 94.6 
60,    1.0,  1.3, 97.6 

file2.dat

Time, read1,read2,read3
20,   5.3, 20.6, 74.2
25,   9.2, 27.2, 63.6
30,   9.5, 20.3, 70.2
35,   9.9, 22.1, 68.0
40,   5.3, 19.0, 75.7
45,   3.4,  9.6, 86.9
50,   2.3, 15.3, 82.4
55,   2.7, 10.6, 86.7
60,   1.7,  1.0, 97.3

file3.dat

Time, read1,read2,read3
20,    6.8, 20.6, 72.6
25,    6.2, 29.5, 64.3
30,    5.3, 23.6, 71.1
35,    4.5, 15.6, 79.9
40,    5.5, 17.4, 77.1
45,    3.7, 10.5, 85.8
50,    9.1, 16.6, 74.3
55,    2.8,  3.8, 93.4
60,    1.0,  1.6, 97.4

file4.dat

Time, read1,read2,read3
20,    9.1, 24.2, 66.7
25,    5.1, 26.2, 68.7
30,    9.2, 25.9, 64.9
35,    4.4, 18.4, 77.2
40,    7.6, 17.3, 75.2
45,    4.8,  8.2, 87.0
50,    2.0,  2.1, 95.9
55,    2.6, 10.3, 87.1
60,    2.8,  0.6, 96.6

Script is
 1
 2
 3
 4
 5
 6
 7
 8
 9
10
11
12
13
14
15
16
17
18
19
20
21
22
23
24
25
26
27
28
29
30
31
32
33
34
35
36
37
38
39
40
41
42
43
44
45
46
47
48
49
50
51
52
53
54
55
56
57
58
59
60
61
set terminal pngcairo
set output "readings.png"

set style data histogram
set style histogram rowstacked
set yrange [0:100]
set xtics 5
set style fill solid
set key outside
set boxwidth 0.5 relative

set datafile separator ","

set multiplot layout 4,1 title "MultiArea\nReadings" font ",8" offset 21,0

set ytics border font ",6" offset 0.7,0
set key title 'Readings' font ",6"
set key font ",5"
set key bottom right

set size 1,0.25
set origin 0,0.25
set lmargin at screen 0.1
set tmargin at screen 0.23
set bmargin at screen 0.05
set rmargin at screen 0.85
set title "Area4" font ",6" offset 0,-0.7
set xtics border font ",6" offset 0,0.7
plot for [COL=2:4] 'file4.dat' using COL:xtic(1) ti col
unset xtics

set size 1,0.25
set origin 0,0.50
set lmargin at screen 0.1
set tmargin at screen 0.48
set bmargin at screen 0.27
set rmargin at screen 0.85
set title "Area3" font ",6" offset 0,-0.7
plot for [COL=2:4] 'file3.dat' using COL:xtic(1) ti col
unset key

set size 1,0.25
set origin 0,0.75
set lmargin at screen 0.1
set tmargin at screen 0.73
set bmargin at screen 0.52
set rmargin at screen 0.85
set title "Area2" font ",6" offset 0,-0.7
plot for [COL=2:4] 'file2.dat' using COL:xtic(1) ti col

set size 1,0.25
set origin 0,0.95
set lmargin at screen 0.1
set tmargin at screen 0.97
set bmargin at screen 0.77
set rmargin at screen 0.85
set title "Area1" font ",6" offset 0,-0.7
plot for [COL=2:4] 'file1.dat' using COL:xtic(1) ti col

unset multiplot
exit

Going through the steps:
  • Line 1-2: The output has to be an image png file
  • Lines 4-10: Histogram settings common for all the 4 plots.
  • Line 14: Title of the graph.  Offset is used to print it in the top right position.
  • Line 17-19: Individual plots key information display settings
  • Line 21: The size of the Area4 plot 
  • Line 22: The starting position of the Area4 plot
  • Line 23-26: Margins of the plot
  • Line 27: Title of the plot
  • Line 28: Font settings and position of Xtic labels
  • Line 29: Setting the plot
  • Line 30: Unsetting xtics so that xtic labels do not appear in all the above plots
  • Line 32-58: Drawing the other Area plots in the multiplot
  • Line 60: End of multiplot
  • Line 61: Only after exit is called, the output image file will be ready for viewing
Resultant graph is

Saturday, May 9, 2020

Gnuplot - Nonuniform Matrix Data

Nonuniform matrix in Gnuplot refers to a type of data in matrix format.  In this the 
  • first row contains the x-coordinate position
  • first column contains the y-coordinate position


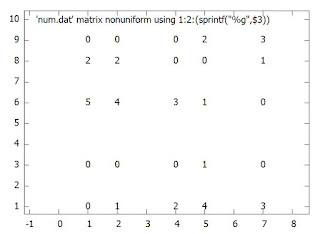
Lets pick an example matrix and the command.  Lets plot with labels for easier understanding.

num.dat:

  ,1, 2, 4, 5, 7
6, 5, 4, 3, 1, 0
8, 2, 2, 0, 0, 1
3, 0, 0, 0, 1, 0
9, 0, 0, 0, 2, 3
1, 0, 1, 2, 4, 3

Command:

plot 'num.dat' matrix nonuniform using 1:2:(sprintf("%g",$3)) with labels

You can see the command 'matrix nonuniform'.  If we use nonuniform, we explicitly mention it.  If not, it will consider that as uniform.


Now, for making the graph colorful.  Same matrix with palette style 

gnuplot> plot 'num.dat' matrix nonuniform using 1:2:3 \
>with points pointtype 5 pointsize 8 linecolor palette

The different point parameters, make a similar heatmap kind of graph using point type 5(square) and palette.


Gnuplot - Matrix Uniform Data

It is a common Matrix with either rowheader/columnheader and data. Format and example of the matrix with row and column header is 


There may also exists few matrix that doesn't have the headers.  Now, Lets plot it.  Matrix and command

num.dat:

,Apple,Bacon,Cream,Donut,Eclair
Row1, 	5, 4, 3, 1, 0
Row2, 	2, 2, 0, 0, 1
Row3, 	0, 0, 0, 1, 0
Row4, 	0, 0, 0, 2, 3
Row5, 	0, 1, 2, 4, 3

Script:

set datafile separator ","
set palette defined (0 "white", 5 "green")
plot 'num.dat' matrix rowheaders columnheaders  with image

Palette when defined with 0 as white and 5 as green.  It is the basic heatmap.  Any values that are in between will have proportionate white and green colors in them.  Resultant graph will be:


Lets draw a colorful graph.  Here is the data and the script.

num.dat:

,Apple,Bacon,Cream,Donut,Eclair
Row1, 	5, 4, 3, 7, 5
Row2, 	3, 8, 6, 8, 6
Row3, 	6, 7, 5, 7, 5
Row4, 	3, 5, 3, 8, 3
Row5, 	6, 7, 5, 4, 3

Script:

set datafile separator ","
set palette defined (3 "blue",5 "red",8 "green")
plot 'num.dat' matrix rowheaders columnheaders  with image

You see the colorful graph resulted.


NOTE: My palette is defined from 3 to 8.  If your data got any value not within 3 and 8.  The palette adjusts itself and becomes messy like the one below.  Intentionally I inserted 0 in the table and see the palette stretched itself from 0 to 8.


Using 'using'

The following is the demonstration of how we can use 'using' command.  For this purpose we use the uniform matrix without any row or column headers.
num.dat:

5, 4, 3
2, 8, 0

Script:

set datafile separator ","
plot 'num.dat' matrix using 1:2:(sprintf("%g",$3)) with labels

The resultant graph contains the x,y matrix positions as xtics and ytics.The values are printed using sprintf command.
Now, we plot 4 copies of same matrices at 4 different positions.  Labelled with green is the matrix at default position.  Red Labelled will be moved 4 position away from x-axis.  Blue Labelled will be moved 3 positions above from y-axis.  Violet labelled will be moved away both on x-axis and y-axis.  The metric is mentioned in the using command.

plot 'num.dat' matrix using 1:2:(sprintf("%g",$3)) with labels textcolor rgb "green",\
'num.dat' matrix using ($1+4):2:(sprintf("%g",$3)) w labels tc rgb "red",\
'num.dat' matrix using 1:($2+3):(sprintf("%g",$3)) w labels tc rgb "blue",\
'num.dat' matrix using ($1+4):($2+3):(sprintf("%g",$3)) w labels tc rgb "violet"

Result is:

Friday, May 8, 2020

GnuPlot - NewHistogram

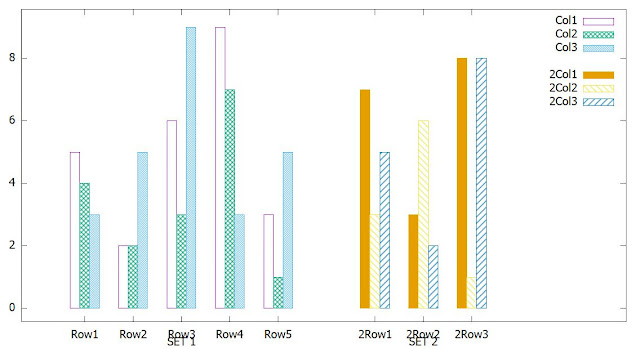
NewHistogram, is the command using which we can group histograms into sets.  To demonstrate this, we use the following data files:

num.dat:

    ,Col1,Col2,Col3
Row1,	5,   4,   3
Row2,	2,   2,   5
Row3,	6,   3,   9
Row4,	9,   7,   3
Row5,	3,   1,   5

num2.dat:

    ,2Col1,2Col2,2Col3
2Row1,   7,    3,    5
2Row2,   3,    6,    2
2Row3,   8,    1,    8

Example script to demonstrate

set datafile separator ","
set style data histogram
set style histogram pattern 8
plot newhistogram 'SET 1', for [COL=2:4] 'num.dat' using COL:xtic(1) title column,\
 newhistogram 'SET 2', for [COL=2:4] 'num2.dat' using COL:xtic(1) title column

The command will be like joining two plots together.  We can use line graph or histogram or any other with histogram. Usual syntax will be 'newhistogram <label>'.

In our script we had 2 separate plots.  One for num.dat and other for num2.dat.  We use the prefix 'newhistogram <label>' for both and join it in a single plot.  The resultant graph will be:


Thursday, May 7, 2020

GnuPlot - Histogram

Today, we do some plots for histogram. 

We use the following data 'num.dat'

    ,Col1,Col2,Col3
Row1,	5,   4,   3
Row2,	2,   2,   5
Row3,	6,   3,   9
Row4,	9,   7,   3
Row5,	3,   1,   5

Boxes

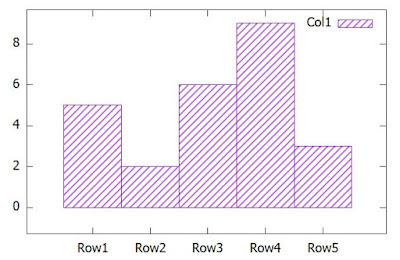
If a single column plot is needed, 'boxes' will be very helpful. The following commands.

set datafile separator ","
plot 'num.dat' using 2:xtic(1) with boxes fill pattern 5 title column

'using 2' means we plot only column 2.  'xtic(1)' means xtic labels will be from column 1.  The resultant graph will be

Histogram Clustered

Clustered Histogram means putting all the columns side by side.  We plot all the columns in the histogram graph.  The following code:

set datafile separator ","
set style data histogram
set style histogram clustered
set style  fill pattern 4
plot for [COL=2:4] 'num.dat' using COL:xtic(1) title column
  • data separator will be comma 
  • Setting the style to be histogram and the type clustered.
  • Plotting the columns 2 to 4.  Setting the column 1 entries as xtic labels.
Resultant graph will be

Histogram Rowstacked

In Rowstacked the rows are stacked one on top of another.  Like adding the elements of rows. The following code is an example

set datafile separator ","
set style data histogram
set style histogram rowstacked
set style fill pattern 4
plot for [COL=2:4] 'num.dat' using COL:xtic(1) title column

The resultant graph will be

Histogram Columnstacked

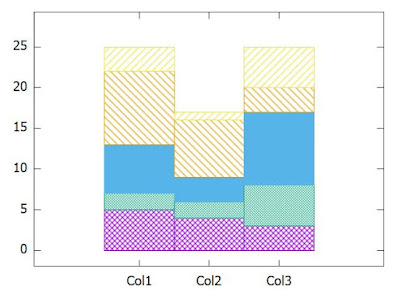
In Columnstacked, we stack the columns into towers.  The elements of the column are placed on top of another.

set datafile separator ","
set style data histogram
set style histogram columnstacked
set style  fill pattern 5
plot for [COL=2:4] 'num.dat' using COL title column
  • Plot command is different.  We do not use xtics.  Only 'title column' would do the trick.
The resultant graph is 

GnuPlot - Line


Lets put down some of the information related to Line Graph.  The commands and the corresponding graph are displayed in the image.

Line Graph


We can have user defined pattern with characters '_' '.' '-' (underscore, dot, hyphen).  The resultant plot will have big dash for underscore, medium dash for hyphen and small dash for dot.

plot 1 dashtype 1 lw 3, 2 dashtype "_ . - " lw 3